Thursday, October 17, 2013

Metal Roofs - Traditional and Modern Explorations

I consider myself a modernist but I must confess, in my younger years I had a great love of all things old. I loved the grand stone-clad buildings and the intricate detailing of a column, corbel and lintel. Through the years my focus slowly shifted to modern work and design but that first love was always hidden away inside me somewhere.

Once I finished architecture school and started working, I made a move to Montreal and while there I was fortunate to work with a firm that specialized in historical restoration, Fournier Gersovitz et Moss Associés (FGMAA). It was here that this inner love of historical buildings, construction methods and materials was reawakened. During my time at FGMAA I was involved in numerous restoration projects which usually meant I was out in the field; up on a roof or hanging off the side of a building while various trades either took apart a façade or roof, or else were busily reinstalling or doing a repair. It was a fantastic experience and I learned intimately about the craft that goes into making these types of buildings a reality.

There were two projects I worked on at FGMAA that remain foremost in my mind and probably had the biggest influence on me, one due to its sheer size and complexity, the other because of its details. The first is la Fondation Daniel Langlois, a restoration of the original Port Authority building in old Montreal. The project was well along when I came aboard, but I quickly learned much of its history and was fortunate to be involved in some of the site coordination and inspections. The original intent was a minor restoration of the building but during early work a fire broke out that destroyed much of the interior, most of the roof and all the cupola. 

Archival photo of the original building     -     Photo of building after fire
The client took the bold step of deciding to completely restore the building to its original glory as well as enlarging it with a pool building at the rear. This meant archived photos, remnants from the fire and other sources had to be studied in order to rebuild what had been destroyed. The difficulty of the restoration was that in order to recreate some of the work, builders had to source out from long-retired masons and metal workers who knew how to build walls in the old manner, with structural masonry. This means rather than having a typical steel stud wall in front of which a stone cladding is set, the whole wall would be solid masonry and would support the floors above. It was decided that the pool addition would also be built in the same manner. The retired masons set themselves up onsite and essentially taught the younger masons how to construct the wall.

The project also included a great deal of highly detailed metal work on the upper walls and roof including the new cupola. Historically, the benefit of the malleability of metals has made them easy to work with, and because of their impervious nature they are perfect for shedding water. Metalwork has even been used to reinterpret stonework because the same effects can be created quicker and easier than carving out hard stone. Metal can be hammered over top wood framing or carvings to recreate their intricate detail then replicated in a fraction of the time it would take to hand-carve stone. The photos below illustrate how this technique and material was used to exceptional success on the building.

Metal window arch before installation     -     Metal detailing at roof level


Cupola framework being craned into position     -     Finished building


The other project I was involved in was a small chalet in Montebello. Again, it was an existing building but this time a much smaller Swiss style chalet that was to be extensively remodeled and restored. The two most interesting aspects of this small chalet was the use of exposed wood beams and wood detailing throughout the house, and the introduction of a standing seam copper roof. Copper is a beautiful material and has the capability of imparting a magical, ethereal quality to buildings. It can be coated to retain its lustrous finish or left to weather and develop its own patina. The typical greenish tone that develops is a factor of humidity, temperature and chemical interaction (usually pollutants help the process along). Not long after the roof was installed I was surprised to arrive on site for an inspection and find that the roof had already turned completely black. This would slowly change to the more familiar green tone.

View of renovated Chalet     -     Copper clad chimney with detailing

For such a small roof there was still a great deal of fine detailing that was incorporated into the design, giving me a good cross section of techniques and experience to draw from in future projects. Inside the house we also constructed a feature wall in the master bathroom of copper fish scale shingles. Various techniques can be used to create paneling for a copper surface such as the fish scale and standing seam techniques that allow smaller sections of metal to be joined together in a watertight assembly while also imparting a texture to the building. The house also featured various metal details such as copper birds on the roof ridge and imprinted flower motifs on the chimney.

Fish scale copper shingle clad wall in master bathroom     -     New clear storey or Lucarne with copper roof 


While I loved my experience with the stone work, I think from these two projects the thing that intrigued me the most was the potential of the metals. To me it seemed to be a material that had more room for exploration, and the potential of taking the historical techniques and installation methods and reinterpreting them for modern projects, I think provides great intrigue.

While the benefit of metal is its pliability this is also its limiting factor in that it cannot be used in large flat panels as it will start to “oil can” or buckle. To maintain its strength and rigidity it needs to be bent to create stiffeners running perpendicular to the main body of the panel. As a result, the general aesthetic of metal is that it will always be composed of a series of panels fastened together in some format. Traditionally there have been many different configurations including tiles and scales as mentioned above, and panels, linked together with various bends either at the back of the panel or exposed upright on the outer face. These upright bends are referred to as the standing seams of the panels and it’s these that give the panels rigidity.

Various images of metal roofs and cladding techniques possible (as taken from Rheinzink )

 For the house that we design on GregoryRoad, I think pretty much from the beginning I had in my head that I wanted to use metal roofing and I think that decision started to influence the remainder of the design decisions helping to shape the design. I spent some time exploring how the roof plane might undulate and bend to open the roof to light and express the functions that were contained below, but in the end the roof became a very simple form that I think allows the volumes of the house stand out as the key elements of the composition and design.

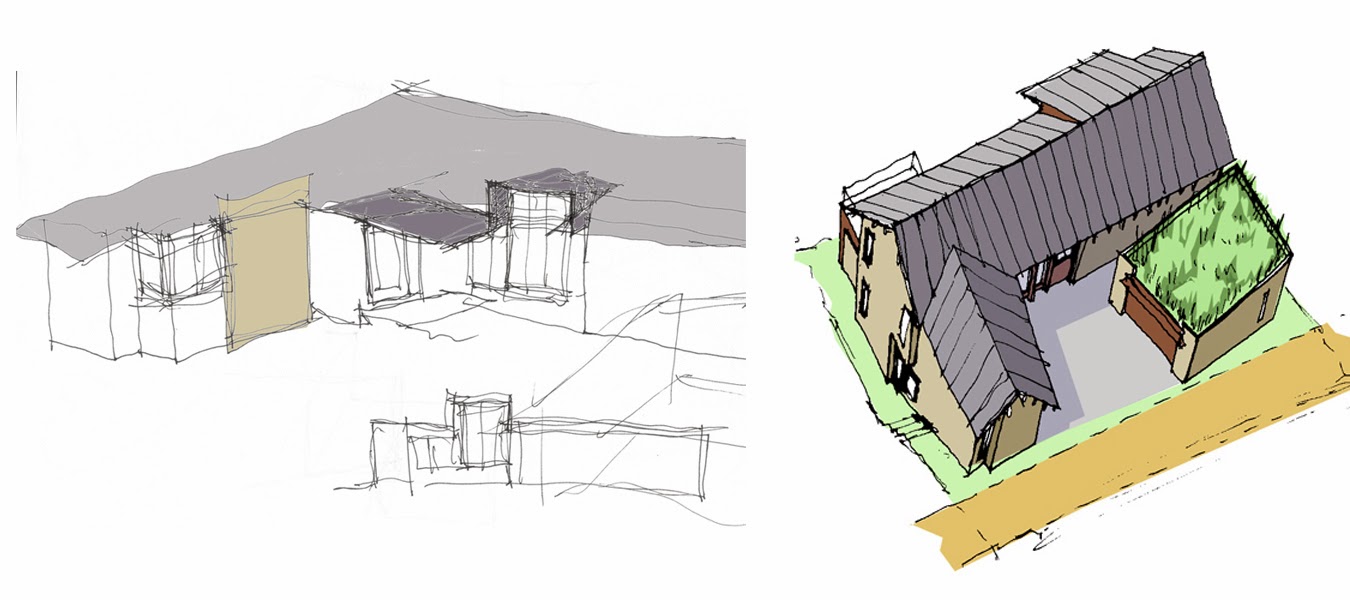
Early sketch and roof study     -     Sketch close to design completion


While the house is quite simple in its form the roof, both with the metal and through the exposed rafter tails (the wood members that are exposed on the underside of the roof), provides a rhythm and detail that softens the design and gives drama. By leaving the rafter tails exposed rather than cladding them is typically done, the structure is exposed both providing an understanding and honesty of how the home is built as well as celebrating it. We were able, for the most part to match of the seams of the roof to the rafter tails so that the two work together visually providing the main rhythm to the house.

Installation of metal roof


The clean lines of the standing seam roof work well with the smoothness of the wood Silva Panels and the smooth stucco. The reflective quality of the metal also provides a changing mood to the house depending on the quality of light. It can appear very bright or quite dark depending on the light of the sun and the metal will also reflect colour and tones that might be in the sky, giving the roof a life of its own. It was a good experiment and I am happy with the results, but of course I look forward to pushing it further the next chance I get.

Completed house showing metal roof, rafter tails and wood panelling used on walls


Friday, March 30, 2012

Light and Air

Basements have a stereotype as being dark and dungy and typically are an afterthought when it comes to functionality and use. Being dug into the ground and usually with low ceilings, the basement is not the first choice as a place to retreat in your home. A walkout basement is where one side of the basement has access to the outdoors, this can make the basement more appealing, but often this only partly helps to alleviate the reaction of being “in the basement”. With our main living space making use of what is our “basement”, we wanted to ensure that there was no way that you felt the typical negative aspects of being buried in the ground.
Two main design ideas were used to eliminate this feeling of basement “compression”, high spaces and access to light on more than one side. On this lower level of the house the ceilings are 10’ as opposed to the 8’ ceilings on the upper floor. In this way the house opens up more as you descend into the lower level. For light, providing large windows on the open end of the basement was the first step for providing good light but for the side that is buried below ground we made use of skylights from above to provide a wash of light across the back wall.

I have been interested in the use of light wells and skylights for some time having experienced their use in other projects around the world. One project that I found exceptionally compelling is Renzo Piano’s Atelier Brancusi in Paris. The project was designed to house the works of Brancusi and it is meant to mimic the set up and quality of light that his original studio had. The majority of the space is top lit with a series of saw tooth clear story windows or skylights. I found the quality of light to be sublime and the work of Brancusi to be equally elevated by the quality of the light.


This same effect is used in our home by using the northern light. The light quality is more subdued and consistent. A southern exposure would have heated the house to extreme temperatures in the summer months. I explored different expressions of the skylights through the exterior massing of the house in early design iterations but in the end I chose to simplify the roof and articulate the openings up to the skylights in a more dramatic approach.


The skylights tie into a series of windows on the main floor elevation and frame an opening in the floor to the lower level.


We have incorporated an operable skylight into the combination of skylights to allow the light well to function as a heat chimney where rising hot air can be evacuated out of the house and allow the air flow thru the house during the hot summer months.

Thursday, December 8, 2011

Water and Gravity


Building a home on a lot means consuming open ground. Open ground is essential for absorbing water, so less ground means less chance to absorb water from rain and snow. This means that the water that accumulates needs to be dealt with in another way. In most cases this water is funnelled with the use of gutters, downspouts and sloped driveway slabs to a storm water system run by the town or city.  This causes a burden on the town or city. The idea of requiring each new home to deal with its own accumulating site water rather than relying on the town or city is a growing requirement for many jurisdictions.

While we have provided on site dry wells (gravel pits buried in the ground to capture the water and allow it to be dispersed back into the town’s storm water system at a slower rate), we have gone one step further and provided a water storage tank buried below ground. The water that we are able to gather and store will be used for watering our garden.


The tank we used is from Premier Plastics and is a 4000 litre tank buried at the side of the house. In terms of how much water we can expect to accumulate and use, Outland Design did the following analysis:

 
  • We have the potential of collecting 5800 litres of water from rain runoff from the roof and walk way areas (based on environmental information and roof area).
  • With a garden area of 5 m2 which would require watering at 25mm per week, the volume of water required would be 0.125 cubic meters or 125 litres per week.
  • With a 4000 litre cistern we will be able to provide water for approximately 32 weeks or 8 months of the year.


The benefit of our sloping site also allows us to use gravity to make all of this work. No pumps required. Water drains from the roof and site down into the tank in the ground. The garden area is below the tank on the lower tier of the lot which allows the water in the tank to flow down to the garden area. There are some extra costs to this system, but the benefits of having a water supply that is not tied to drought restrictions imposed by the City, and making use of the water gathered rather than paying for it, have their benefits.

Friday, October 21, 2011

The Modern Landscape

For the landscape portion of the design we are working with a talented group of landscape architects from Outland Design. As an architect it has been gratifying to work with other experts, in this case, designers who have seamlessly linked the site to the house. The result is a modern planting palate and hardscape design.
The use of native plant species have been strategically selected and placed so that beauty can be realized through all 4 seasons. Some of the plant types we are working with are:
·         Trees: Hot Wings Maple, Sutherland Garagana, Swedish Columnar Aspen
·         Bushes: Saskatoon, Butterfly bush, Medora Juniper, Alpine Currant, Morden Fireglow Rose, Red River Rasberry, Blue Fox Willow, Snow Berry
·         Ground cover and grasses: Kinnikinnick, Lady Fern, Ice Dance Sedge, Winter Creeper, Purple fountain grass

Inspiring precident images for generating landscape ideas and direction
The main living spaces of the house (kitchen, dining room and living room) continue to the outdoors naturally from the “U” shape of the house plan. This part of the house wraps around the patio providing hard surfaces for outdoor sitting / dining as well as a fire pit area. Various planting provides screening and focal points.
From the patio, a series of terraces draw you to the lower level garden and open grass area. The garden area features planting beds and area for a planned green house, while adjacent to this is the open grass area for play. Bordering the grass are grape vines to the north side against the retaining wall while a row of Honeysuckle bushes will create a buffer from the last slope down to the vineyards.

Sketch of landscape plan from Outland
The sustainable design elements included in the design are:
·         green roof on the garage
·         rainwater harvesting and reuse for the production garden area
·         use of native and other low water requirement plantings
·         water efficient irrigation system

Wednesday, July 20, 2011

Retaining Walls - The Nilex System

As a result of the slope of our lot we need to provide some retaining walls. We spent some time devising the best configuration and position of walls in order to maximize the usable space and minimize the amount of wall required. As part of this equation is an easement at the bottom of the property. This is for a sewer line that runs across the property. This second easement, like the one at the top of the property, means that any retaining wall we do build can’t be within this easement. In the final layout we adjusted the grades so that only one wall was required and kept the retaining wall close to the house to create two zones for the backyard. The upper hard surfaced patio area next to the house and then the vegetated area down below where there is more open space available.

 For the construction of the retaining wall, we first looked at concrete but it would have been too costly an option with the size of wall we needed. Researching other options brought us to the Nilex SierraScape system. It is very much like a Gabion wall only rather than individual blocks pieced together and built up to form a wall, it is a wire-formed retaining wall system that utilizes a geogrid running back into the soil for support. The system is flexible which helps with any differential settlement and since it is composed of rocks piled together it also allows water to seep through freely, eliminating the hydrostatic pressure issues that typical concrete retaining walls have. I quite like the look and feel of the wall and I think it provides a nice contrast to the smoother lines of the house above. As an added benefit, it will also be a great planting wall since the metal forms are much like a trellis providing a backdrop for vines and plants to grip and climb. I also hear it works very well with grapes both because they can climb the wall and also because of the warmth the wall holds.

Saturday, May 28, 2011

Green Garage

Our lot is connected to four other lots that sit together off of the main road. Because they are not directly on a high traffic road there is an easement  that runs parallel to the main road allowing access to each property. As this private road drops to the lots, a berm rises to create a further landscaped buffer from the main road.
This easement sets our house further back on the property with our garage being entered from the side. The house is extended up in line with the garage resulting in a “U” shape to the house creating a courtyard setting. This gives the house a sense of privacy.

We also decided to detach the garage from the house to keep it separate from the living space. The break between the house and garage provides a passage into the backyard. Rather than circulating around the outside perimeter of the house you can “cut through” to the backyard. To make this passage more welcoming I rotated the garage wall so that it starts wider and then compresses as you move inwards.

This separation of the two buildings allowed for some other experimentation. I have been interested in doing a green roof for some time for various reasons. Yes, it provides greater insulation value, and yes, it holds storm water. But it is most interesting because it maintains a natural environment by maintaining vegetation that would typically be eliminated. It is currently an expensive endeavour to create a green roof, but having this smaller roof to work with was the perfect opportunity. The other benefit is that with the garage now sitting separate from the house I could differentiate it even further from the main house.  The main house has a pitched roof that will be sheathed with a standing seam metal roof. Clean with sharp lines. With the garage now having a green roof this vegetated surface will stand out in sharp contrast to the main house. The green roof also extends the landscaping at the front of the house to a greater area increasing the visual appeal of the house.

Monday, April 11, 2011

The Joy of Framing

I have to admit one of my favorite parts of construction is the framing. In a matter of only a few weeks the whole house starts to takes shape. This is an exciting period when each visit to the site brings some new surprise as the house comes into being. This is also the first time that you really start to get a feel for the spaces and also for the views. Because of this, it is also a good time to recheck the design. Framing can be one of the easiest and most inexpensive things to change during the construction process and it is always best to make any adjustments earlier rather than later. One such example for us was with a window in the master bathroom area. It's position on the house is set back along the side of the neighbouring house so the possibility of view was slight. I wanted to keep it in though just in case. As it turned out my original fear was correct so we eliminated the window deciding instead to add a skylight for natural light.

 Below are some photos of the house as it took shape over a period of six to eight weeks.